GETTING STARTED
INSURANCE COMPANY STORIES
SERVICE PARTNER STORIES
API BASICS
API ENDPOINTS
COMPONENTS
LEGACY
Embedding widget guidelines
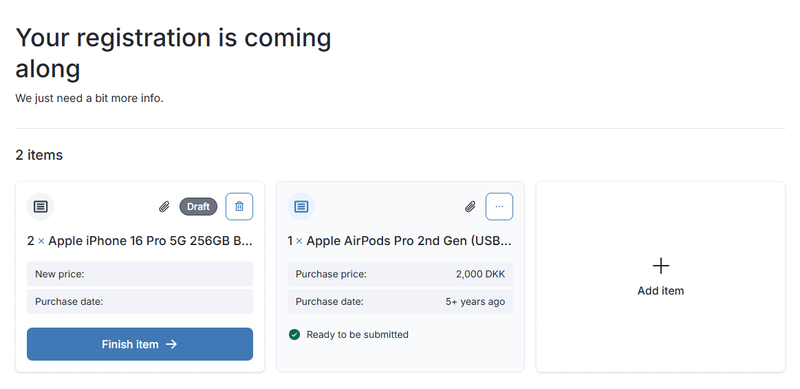
This document describes the process of embedding the Itemization widget into 3rd party web page.
Background
A widget is an application that provides ClaimShop Self Service functionality directly on a 3rd party web page. Once the widget is added to a site, no technical maintenance is required. Users are free to add as many items as they want to and they can use all features that would be available if they use claim portal instead.
Prerequisites
- Javascript needs to be enabled in end user browser
- Document charset is UTF-8
Integration
To embed the Itemization widget on a web page, you must perform the following step:
Widget container
Add a <div> element to the predefined place on a page. Choose a unique id for this element (for example: "itemization-widget-container" ). This div will be a container for the widget.
<div id="itemization-widget-container"></div>Embedding widget script
Javascript:
var script = document.createElement("script");
script.setAttribute('defer','');
script.src = "{integrationLink}?sso_token={ssoToken}&widget=true&target={itemization-widget-container}&options={optionsVariableName}";
document.getElementsByTagName("head")[0].appendChild(script);
HTML:
Add <script> element before the closing </body> tag
<script type="application/javascript" src="{integrationLink}?sso_token={ssoToken}&widget=true&target={itemization-widget-container}&options={optionsVariableName}" defer>
</script>
Where:
- integrationLink is a URL link received from the Scalepoint Case Data API; this link contains the case token. For example:
https://sanbox.scalepoint.com/api/integration/dk/abcinsurance/v1/case/ci.74316e01-53c0-413d-8abe-e089aad3df5e - sso_token request parameter is an SSO short-lived token received from the Scalepoint Authorization Service required
- target request parameter is an id of the div container (itemization-widget-container in the example above) required
- options request parameter is a name of the variable containing settings (default name is scalepointItemizationWidgetDefaults) optional
Settings (optional)
Widget accepts setting that can customize its behavior.
By default, widgets expect them in the variable scalepointItemizationWidgetDefaults in windows object, but this name can be changed and provided via the options parameter.
List of currently supported settings:
-
language - tells the widget to change its translations to the provided language ["en", "de", "da", "de-CH", "fr", "it", "no"]
-
skipIntro - Force skipping the introduction/welcome screen for all users (no matter if they saw it before or not - normally the user is supposed to see it only once)
-
useExternalControls - Tells the widget if it is supposed to display the bottom navigation buttons for FNOL controlling: add item button and submit claim button
These settings are loaded and used on the initialization of the widget (loading the script), after that changes that user will do to this variables wont be applied until the reload of the widget.
External functions (when useExternalControl === true)
When the useExternalControl flag in settings is set to true, the widget exposes external functions that give the parent application a way to control actions in it.
The parent application can call these functions, and the widget will behave as if the button inside it were clicked.
All functions are stored in the ScalepointSelfService.widget object inside the window.
List of currently supported functions:
-
addItem() - This function triggers the add item flow in the widget (same as the internal "add item" button in the widget do)
-
submit() - This function triggers the submit flow in the widget
-
getItemsQuantity() - This function returns the number of ALL items in the itemization (no matter finished or draft)
<script type="application/javascript">
    window.ScalepointSelfService.widget.addItem();
    window.ScalepointSelfService.widget.submit();
    window.ScalepointSelfService.widget.getItemsQuantity();
</script>
Exposed events
A Widget exposes events that propagate important information about state of the widget/claim that can be observed.
There are many scenarios that could be implemented in response to an event.
One of the most common would be to react to 'scalepointWidget_itemsUpdated' and query the basket to check whether any items are in draft state.
List of currently supported events:
- scalepointWidget_itemsUpdated - this event is propagated after each change made to items in the widget
Page code sample
<!DOCTYPE html>
<html lang="en">

<head>
    <meta charset="UTF-8">
    <title>Title</title>
</head>
<body>
    <div id="itemization-widget-container"></div>
</body>
<script>
  window.scalepointItemizationWidgetDefaults = {
    useExternalControls: true,
    skipIntro: true,
    language: "dk"
  }

  document.addEventListener("scalepointWidget_itemsUpdated", (e) => {
    console.log("Items updated!");
    // check if any item in basket has draft state
  });

  var script = document.createElement("script");
  script.setAttribute('defer','');
  script.src = "https://sanbox.scalepoint.com/api/integration/dk/abcinsurance/v1/case/ci.74316e01-53c0-413d-8abe-e089aad3df5e?sso_token=2b207459114a8f7a8d45a87c39b1649c&widget=true&target=itemization-widget-container";

  document.getElementsByTagName("head")[0].appendChild(script);
</script>
</html>
see more about widget implementation:
